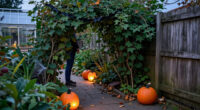
Create a spooky garden display by planning a small layout, making a few simple decorations, and securing them for outdoor conditions. This guide is for beginners who want a clear, reusable Halloween setup using common household and garden supplies. Allow about 2-4 hours, depending on how many decorations you make and whether you need to prepare materials. By the end, your display should be visible after dark without blocking paths, damaging plants, or creating hazards.

Get garden gear delivered free with Prime
- Fast, free delivery on millions of items
- Prime Video, Amazon Music and more included
- Member-only deals all year
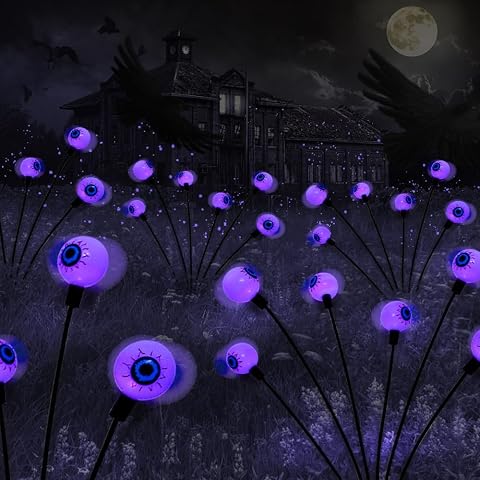
BeHiller 2-Pack Solar Halloween Eyeball Garden Lights
- ✔ Brand: BeHiller
- ✔ Model: BHYQP001
- ✔ Quantity: 2 lights

BeHiller Solar Halloween Bat Garden Lights, 2-Piece Set
- ✔ Brand: BeHiller
- ✔ Model: BHBFGJP1201
- ✔ Quantity: 2 lights

SPINNDO Halloween Garden Gnome Statue
- ✔ Brand: SPINNDO
- ✔ Material: Resin
- ✔ Height: About 5 inches; listing also gives 6-inch dimensions
Difficulty: Beginner | Time: 2-4 hours
What You’ll Need
Tools & Materials:
- Tape measure or string
- Scissors
- Marker
- Garden stakes or short poles
- String, zip ties, or garden twine
- Battery-powered LED lights or lanterns
- Outdoor-rated extension cord only if needed and suitable for the location
- Work gloves
Knowledge:
- Basic cutting and tying skills
- Ability to check the garden for paths, plants, and sprinkler heads
Gather weather-resistant materials such as white fabric, a clean plastic jug, craft paint, and outdoor-safe decorations. Use battery-powered lights where possible. Check local rules before using inflatables, amplified sound, open flames, or decorations near a public walkway. Do not use candles, exposed wiring, or materials that could harm wildlife.
BeHiller 2-Pack Solar Halloween Eyeball Garden Lights
The BeHiller Solar Halloween Eyeball Garden Lights take our top spot because they make a garden display feel active after dark rather than simply adding another static figure. Their swaying 3D eyeballs supply movement, while purple LEDs make the horror motif easier to notice at night. A two-light set also gives us more flexibility than the single SPINNDO gnome: we can place the lights at two points along a path, or group them around a planter or party area.Compared with the bat set, the eyeballs have a more immediately legible scare effect: the description specifies purple light and swaying eyes, while the bat listing gives conflicting glow colors. That clarity helps if we want a particular color scheme. The tradeoff is practical rather than decorative. These are solar-powered outdoor pieces, but they should be brought indoors during storms, and removing their solar panels may stop them working properly. They suit a seasonal display that we can position thoughtfully, not a set-and-forget fixture exposed to every weather condition.We would choose these over the gnome when nighttime visibility and a larger footprint matter; choose the gnome instead for a small shelf, pot, or daytime detail. The eyeballs are the most complete spooky-garden option here, but buyers should be comfortable protecting them in severe weather and leaving the solar components correctly installed.
Pros:
- Swaying 3D eyeballs add movement to an outdoor display.
- Purple LED lighting creates a clearly described nighttime color effect.
- Two lights can be spaced across a path, lawn, or patio.
- Solar power avoids the need for a wired outdoor connection.
Cons:
- The lights should be brought indoors during storms.
- Removing the solar panels may prevent the lights from working properly.
- The supplied information does not specify dimensions or lighting runtime.
Best for: Halloween decorators who want two solar-powered, purple-lit accents with motion for a lawn, patio, or outdoor party display.
Not ideal for: Buyers seeking storm-proof decorations, a non-electronic ornament, or a light that can be disassembled without affecting operation.
Bottom line: Choose the eyeballs for the clearest combination of spooky motion, purple light, and two-piece garden coverage, provided you can protect them during storms.
“Choose the eyeballs for the clearest combination of spooky motion, purple light, and two-piece garden coverage, provided you can protect them during storms.”
BeHiller Solar Halloween Bat Garden Lights, 2-Piece Set
If we want a recognizable Halloween scene rather than a general creepy glow, the BeHiller Solar Halloween Bat Garden Lights make a strong case. The two 3D bats have skeleton detailing, which gives them more character than a plain stake light and makes the set a natural fit beside a path, garden bed, or haunted-house display. Solar power also keeps the arrangement free of a wired connection, an advantage over decorations that need an outlet nearby.These bats fill a different role from the top-ranked eyeballs. The eyeball set emphasizes movement and clearly specified purple LEDs; the bat set emphasizes sculpted theme and scene-building. That distinction matters: buyers looking for a vivid, predictable purple effect have more specific information for the eyeball lights, while bat fans may prefer the more coherent Halloween figure. However, the bat listing mentions both purple and green glow, so we cannot confidently promise which color the lights will produce. Treat that as a genuine uncertainty if matching the rest of a display is important.The description identifies plastic construction and indoor or outdoor use, but it does not provide dimensions, brightness, runtime, or a storm-handling instruction. We should not infer more weather protection than the listing states. Compared with the compact SPINNDO gnome, the pair offers a more visible and themed arrangement; compared with the eyeballs, it sacrifices clarity about the lighting effect. This is the better choice for bat-centered Halloween scenes, not for buyers who need precise color expectations.
Pros:
- Two 3D bats create a paired, themed garden display.
- Skeleton details reinforce the Halloween look.
- Solar-powered design suits outdoor placement without a wired connection.
- The stated use cases include pathways, gardens, and outdoor parties.
Cons:
- The description conflicts about whether the glow is purple or green.
- Dimensions and lighting runtime are not provided in the supplied details.
- The supplied information does not clarify storm protection or storage.
Best for: Shoppers arranging a Halloween pathway, garden bed, or haunted-house scene around bat imagery and wanting a matching two-piece set.
Not ideal for: Buyers who need a confirmed light color, detailed size or runtime information, or a clearly stated storm-storage plan.
Bottom line: Pick the bat lights when their sculpted Halloween theme matters more than having a confidently specified glow color.
“Pick the bat lights when their sculpted Halloween theme matters more than having a confidently specified glow color.”
SPINNDO Halloween Garden Gnome Statue
The SPINNDO Halloween Garden Gnome Statue is the simplest pick in this group: one freestanding resin figure, no lighting to position, and a small footprint suited to a flower pot, shelf, or crowded display. Its red color and playful horror theme lean more whimsical than the glowing BeHiller lights. That makes it a useful counterpoint if we want a spooky detail without turning the whole garden into a nighttime scene.Its main advantage over either two-piece light set is placement flexibility. We can tuck a small statue beside a planter or bring it indoors, while the solar lights need a suitable outdoor position to deliver their intended effect. The gnome is also described as water-resistant and wipe-clean, which is a practical distinction from the eyeballs, whose instructions say to bring them inside during storms. Still, water resistance is not a guarantee of all-weather durability, and the listing gives two size references: about five inches tall and dimensions of 3 by 3 by 6 inches.That compact scale is also the clear compromise. Against the bat and eyeball pairs, this single figure is less likely to anchor a path or stand out across a yard, especially after dark. Choose it for a small, playful accent or as a seasonal gift; skip it if your goal is an illuminated, high-visibility garden display. Among these three, it is the least dramatic but the easiest to fit into a small space.
Pros:
- Compact size fits shelves, flower pots, and smaller arrangements.
- Water-resistant resin is suitable for indoor or outdoor display.
- Freestanding format needs no wiring or solar setup.
- Playful horror styling can soften a more intense Halloween scene.
Cons:
- Small scale may disappear in a large garden display.
- The listing conflicts between an approximately five-inch height and six-inch dimensions.
- It provides no illumination or pair of decorations.
Best for: Anyone adding a small, playful horror-themed detail to a flower pot, shelf, porch display, or compact garden arrangement.
Not ideal for: Shoppers who want lighting, a large outdoor focal point, or a two-piece display that can cover more area.
Bottom line: Choose the SPINNDO gnome for a low-fuss, compact Halloween accent, not as a substitute for visible garden lighting.
“Choose the SPINNDO gnome for a low-fuss, compact Halloween accent, not as a substitute for visible garden lighting.”
As an Amazon Associate we earn from qualifying purchases.
Before You Start
Choose a display area you can reach safely in daylight. Check the weather forecast and avoid setting up lightweight items before strong wind or heavy rain. Keep every decoration out of walkways, driveways, gates, and emergency exits. Do not tie materials tightly around living branches, and do not push stakes into areas where irrigation lines or buried cables may run. If children or pets use the garden, avoid sharp edges, small detachable pieces, and low trip lines.
Step-by-Step Instructions
Step 1: Choose and measure the display area
Walk the garden in daylight and choose one focal area, such as a fence, a sturdy tree away from a path, or a planting bed. Measure the space with a tape measure or string. Mark the positions of paths, steps, sprinklers, and plants you do not want to cover. Plan the decorations inside the chosen area rather than spreading them across the whole yard.
Tip: Keep the display compact. A few visible shapes look clearer than many small objects scattered around.
Check: You have a measured area with clear boundaries and no planned decorations over paths, access points, or delicate plants.
Step 2: Plan the display from front to back
Sketch a simple layout on paper. Place the largest decoration at the back or center, medium items around it, and low lights or small props near the front edge. Leave enough space for people to pass and for you to water or maintain nearby plants. Add a light source to the plan if you want the display to show after dark.
Tip: Use no more than two or three main shapes or colors, such as white ghosts, orange lights, and black silhouettes. This makes the scene easy to read from the street or patio.
Check: Your sketch shows where each item goes and leaves a clear route through and around the garden.
Step 3: Prepare materials and make a simple ghost
Cut a piece of white fabric large enough to hang over a lightweight support, such as a clean plastic jug or a short garden stake with a rounded top. Draw a simple face on the fabric with a marker, or attach facial features made from fabric-safe materials. Place the support on a stake or secure it to a sturdy fixed point. Avoid glass, sharp wire, and heavy objects that could fall.
Tip: Use old sheets or lightweight fabric that can be washed and reused. Avoid long trailing fabric that could catch on feet, mower blades, or pet collars.
Check: The ghost has a recognizable face, no sharp or heavy parts, and fabric that stays above the ground.
Step 4: Make a lantern or glowing prop
Wash and dry a clean, empty plastic jug or use a purpose-made outdoor lantern. Draw a face or spooky symbol on the outside with paint labeled for plastic and outdoor use. Put a battery-powered LED light inside, following its instructions, and close the container only if the light’s manufacturer permits enclosed use. Do not use a candle or place an LED device in water.
Tip: Test the light indoors before putting the prop outside. Some battery lights are not rated for rain, even when placed inside a container.
Check: The decoration lights up, the battery compartment is protected as directed, and the prop is stable on a flat surface.
Step 5: Add silhouettes and secondary details
Cut simple shapes, such as bats, cats, or a crooked-looking tree, from weather-resistant card or plastic. Attach them to a fence or stake with ties that can be removed without cutting or scraping the surface. Keep silhouettes away from overhead wires and do not attach them to weak branches. Add only a few secondary props so the main decorations remain visible.
Tip: Round off sharp corners and check cut edges by hand while wearing gloves. Replace any material that splits or becomes brittle outdoors.
Check: The shapes face the viewing area, remain firmly attached, and do not cover signs, lights, or plant stems.
Step 6: Install and secure each decoration
Set up the largest items first, then place the smaller pieces according to your sketch. Push stakes into firm soil only after checking for irrigation and buried services. Use garden twine or suitable ties to secure fabric and props without constricting branches. Set lanterns on level ground or attach them to a stable support. Keep cords out of the display if battery lighting will work.
Tip: Do not use thin fishing line or clear thread across a walking route; people and animals may not see it. Remove any loose tie ends that could snag.
Check: A gentle hand check shows that each item stays in place, while paths and gates remain unobstructed.
Step 7: Test the display after dark
Wait until dusk and view the display from the main approach and from the nearest path. Switch on the lights and check that the focal decorations are visible without shining into a neighbor’s window or a driver’s line of sight. Walk the route slowly to find shadows, trip hazards, glare, and items that disappear against the background. Adjust positions while it is still easy to see what you are handling.
Tip: Use low, steady lighting rather than flashing effects near paths. Avoid strobe lights if children, visitors, or neighbors may be sensitive to them.
Check: The main shapes are easy to see from the intended viewpoint, and the walking route remains clear and well lit.
Step 8: Check weather safety and set a removal plan
Read the labels on lights and decorations to confirm that they can be used outdoors in the expected conditions. Secure or bring lightweight items indoors before high winds or heavy rain. Set a reminder to inspect the display every few days and remove it when the event ends or materials begin to fray, crack, or loosen.
Tip: Keep batteries dry and replace them according to the light manufacturer’s directions. Do not leave damaged battery packs or exposed electrical parts outside.
Check: You know which items can stay outdoors, which need to come inside during bad weather, and when you will inspect or remove the display.
Common Mistakes to Avoid
- Placing decorations where visitors walk or where fabric can trail underfoot. — Mark routes before arranging props, keep low items outside the path, and trim or retie loose fabric.
- Using indoor lights or unprotected electrical connections outdoors. — Choose battery-powered lights or products labeled for outdoor use, and follow the manufacturer’s placement and weather instructions.
- Adding too many small props, making the display hard to read. — Choose one focal decoration and a few supporting pieces, then check the view from the approach after dark.
- Driving stakes into soil without checking for buried lines or irrigation. — Review your property information, avoid known utility routes, and use a surface-mounted support if the location is uncertain.
Troubleshooting
Problem: The display looks flat or is difficult to see at night.
Solution: Move the largest decoration into the clearest sightline, separate overlapping shapes, and add a low-output battery light aimed at the display rather than toward people or drivers.
Problem: Fabric or cutouts keep blowing over.
Solution: Bring them indoors during strong wind. For ordinary breezes, shorten loose fabric and use additional suitable ties or a broader, stable base without damaging plants.
Problem: A light stops working outdoors.
Solution: Switch it off, bring it inside, and check the battery, switch, and weather rating according to its instructions. Replace a unit with signs of water damage; do not open or operate wet electrical parts.
Problem: Paint peels or decorations become soggy.
Solution: Move the item to shelter, let it dry fully, and repaint only with a product rated for its material and outdoor use. Replace warped or brittle pieces rather than trying to secure them in place.
What Success Looks Like
The finished garden has a clear focal point and a small set of coordinated spooky decorations. Each item is stable, suitable for its outdoor exposure, and visible from the intended viewpoint after dark. Paths, gates, plants, and access routes remain clear, lighting creates no dangerous glare, and no loose cords, sharp edges, open flames, or trip lines are present. A gentle stability check and a slow walk through the area confirm that visitors can approach and pass safely.
Next Steps
Inspect the display after wind or rain and before visitors arrive. Bring in items that are not rated for current weather, replace damaged batteries as directed, and remove decorations promptly when they begin to deteriorate. After the event, clean and dry reusable fabric and props, remove ties and stakes, and store everything in a labeled container. Record which pieces were visible and stable so you can reuse or adjust the layout next season.
Frequently Asked Questions
How can I make spooky garden decorations on a small budget?
Reuse clean sheets, plastic containers, and existing garden stakes. Make one simple ghost and a few silhouettes, then use a battery light you already own if its label allows outdoor use. Keep the display compact so you do not need many materials.
Can I use real candles in garden decorations?
No. Open flames near dry leaves, fabric, or plastic can start a fire and can be knocked over. Use battery-powered LED lights and follow the product’s outdoor-use instructions.
How do I stop decorations from blowing away?
Use a stable base, shorten loose fabric, and attach lightweight pieces with suitable ties to a sturdy support. Bring decorations indoors before strong winds; do not add heavy objects where they could fall or injure someone.
What materials hold up best in rain?
Choose materials and lights labeled for outdoor use, and check their care instructions. Ordinary paper, untreated cardboard, and indoor battery lights can soften or fail when wet. Take any item with an unknown weather rating inside during rain.
How many decorations should I use?
Start with one focal piece and two or three supporting decorations. View them from the approach after dark; add another item only if the main shapes remain easy to recognize and the garden stays uncluttered.