
TL;DR
Moving your rig into a closet can drastically cut noise, but ventilation and placement are key. Proper treatment involves targeted absorption, sealing gaps, and understanding the difference between soundproofing and acoustic treatment. Small tweaks can make a big difference.
Ever wish your noisy rig didn’t bother you or your neighbors? The secret isn’t just in buying foam or soundproofing panels — it’s about where and how you place your gear. Moving your setup into a closet might seem simple, but it’s a game-changer for quiet workspaces. The key? Knowing how to dampen sound, block noise from escaping, and keep your equipment cool without turning your closet into a hotbox.
This guide cuts through the noise about soundproofing and treatment. You’ll learn the smartest placement tricks, why “the rig in the closet” works so well, and how to avoid common pitfalls. Ready to turn that tiny closet into a powerhouse of silence and efficiency? Let’s go.
Acoustic dampening
& the rig in the closet.
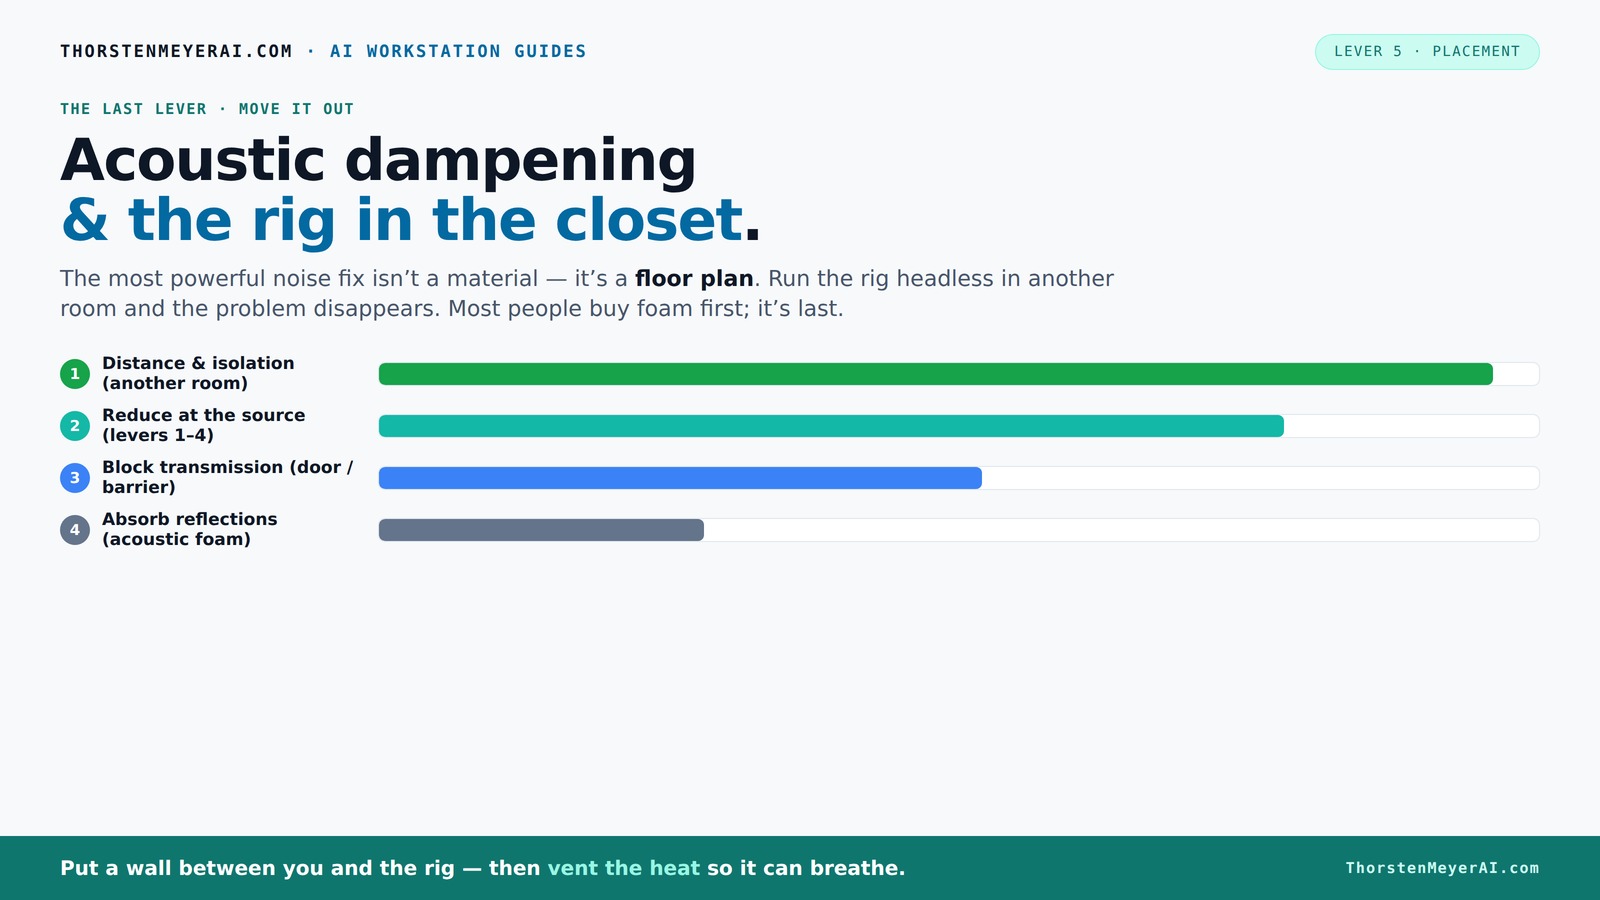
The most powerful noise fix isn’t a material — it’s a floor plan. A rig you can’t hear because it’s in another room beats any amount of foam. Tap the approaches in Part 1 to see what actually works.
(another room)
(levers 1–4)
(door / barrier)
(acoustic foam)
Contain the noise, not the heat
Key Takeaways
- Moving your rig into a closet or separate room offers the biggest noise reduction, often more effective than acoustic foam alone.
- Understand the difference: soundproofing blocks noise transmission, while acoustic treatment improves sound quality inside the space.
- Placement of panels at reflection points and corners is critical to controlling echo and low-frequency buildup.
- Sealing gaps and adding simple DIY absorption like rugs and blankets can drastically cut noise leaks without expensive upgrades.
- Proper ventilation is a must when placing a hot, high-power rig in an enclosed space to prevent overheating and throttling.

Focusound 52 Pack Acoustic Foam Panels 1" x 12" x 12" Sound Proof Foam Panles Soundproofing Noise Cancelling Wedge Panels for Home Office Recoding Studio with 300PCS Double-Side Adhesive
Soundproofing - Acoustic foam panels triangular grooves structure for better noise absorption, helps to reduce and absorb unwanted...
As an affiliate, we earn on qualifying purchases.
As an affiliate, we earn on qualifying purchases.
What ‘Rig in the Closet’ Really Means and Why It Works
The phrase ‘rig in the closet’ isn’t just a catchy phrase — it’s a practical solution. It means placing your high-power, noisy machine in a small, enclosed space to isolate sound. The reason this works so well is rooted in the physics of sound waves. When a noisy device is confined within a small space, the sound waves bounce off the walls, creating a complex pattern of reflections. These reflections cause interference, which can reduce the overall energy of the sound waves as they collide and cancel each other out. Essentially, the space acts as a natural muffler, absorbing and diffusing the sound before it escapes into your main environment.
This setup is perfect for AI workstations, which are often networked and don’t need to be right next to you. As long as you have a wired connection and proper ventilation, your workspace stays peaceful while the rig roars away out of sight and earshot. The key tradeoff here is balancing sound isolation with adequate cooling—since confined spaces tend to trap heat, which can affect hardware performance and longevity.
Real-world example: A friend built a closet booth for his voice recordings. With a few blankets, a reflection filter, and a small fan, he got his space to sound clear and quiet. It’s not perfect — but it’s practical and affordable. The takeaway? The ‘rig in the closet’ isn’t just about silence; it’s about creating an optimized environment where sound and heat are managed effectively.

8 Pack - Bass Traps Acoustic Foam Corner, 8''x8''x12'' Black Bass Traps Corner Studio Foam, High Density and Fire-Proof Acoustic Panels Recording Studio Acoustical Treatments
Acoustic Principle- Bass Trap is a kind of sound absorbing structure specially used to absorb specific low-frequency standing...
As an affiliate, we earn on qualifying purchases.
As an affiliate, we earn on qualifying purchases.
Soundproofing vs. Acoustic Treatment: What’s the Difference?
Soundproofing involves creating a barrier that prevents noise from leaving or entering a space. It focuses on adding mass, sealing gaps, and constructing enclosures that are resistant to sound transmission. Acoustic treatment, however, is about improving how sound behaves inside a room—reducing echoes, controlling reflections, and shaping the room’s sonic character.
Understanding this distinction is crucial because it influences your approach and budget. For example, adding mass with drywall and damping glue like Green Glue can significantly block sound transfer, but it doesn’t necessarily improve the clarity of recordings. Inside your closet, acoustic panels work by absorbing sound waves at reflection points, preventing echo and flutter echoes that can muddy recordings. The tradeoff? Overdoing soundproofing without proper acoustic treatment can lead to a dead, boxy sound, while excessive acoustic treatment without sealing gaps might not reduce noise transmission effectively.
Tip: Use both! Seal gaps around doors and vents for soundproofing. Inside, add panels at reflection points for better sound quality. Recognizing when to prioritize each helps you optimize your setup without wasting resources. Industry experts emphasize that combining both approaches yields the most professional results, especially in small, enclosed spaces.

ZIPWALL ZipDoor ZDS Standard Dust Barrier Zipper Door Kit, 1 Pack, Red
Double Sided Door Zipper: This plastic door kit with preinstalled zippers is a quick way to cover a...
As an affiliate, we earn on qualifying purchases.
As an affiliate, we earn on qualifying purchases.
Where to Place Acoustic Panels in Your Closet for Maximum Effect
Placement is king when it comes to acoustic panels. The goal is to target the first reflection points — these are the surfaces where sound waves bounce off and then reach your ears or microphone. Proper placement ensures that sound reflections are minimized, which in turn improves clarity and reduces muddiness.
Start by facing your microphone or speakers toward the closet wall, then identify the point where sound from that source reflects directly to your listening or recording position. This is often on the wall behind your mic or on the side walls that face your source. Attaching panels at these points absorbs the reflections where they are most intense, preventing echo and reverberation from building up.
For example, placing a foam panel behind your mic cuts down on echo and low-end buildup, which can otherwise cause recordings to sound boomy. When space permits, add panels on side walls and the ceiling above your desk. Covering about 20–40% of these reflection points strikes a balance—enough to improve clarity without overloading the room’s acoustics. The implication? Strategic placement maximizes your investment in acoustic treatment, making your small space sound more professional and controlled.

VEVOR Portable Vocal Booth, 6.56 ft Height, Portable Recording Studio with Travel Bag, Mobile Tablet Stand, Thickened Soundproofing, Sound Isolation Booth for Echo-Free Vocals, Podcasts, Voiceovers
Say Goodbye to Echoes: Built with durable Oxford cloth and acoustic padding, this recording booth for the home...
As an affiliate, we earn on qualifying purchases.
As an affiliate, we earn on qualifying purchases.
Corners and Bass Traps: Why Low-Frequency Control Matters
Corners are the prime locations for controlling low-frequency buildup because bass waves tend to concentrate there due to standing wave phenomena. Without proper treatment, these low frequencies can cause your recordings to sound muddy, boomy, or uneven. Bass traps placed in upper corners are designed to absorb these deep, rumbling waves, preventing them from reflecting and amplifying in the small confines of a closet.
Think of bass traps as specialized sponge for low frequencies. They are typically dense, thick panels — often 4 to 8 inches deep — placed at the intersection of walls and ceiling where low-frequency energy tends to accumulate most. Proper placement is critical because if bass trapping is missed in these hotspots, no amount of regular acoustic panels will fully solve the muddiness or uneven bass response. For example, a small closet with poorly treated corners might produce recordings with a boomy, indistinct low end, making mixing and vocal clarity difficult. Adding bass traps in key corners often results in tighter, more balanced sound, especially at low frequencies, which is essential for professional-quality recordings.
Sealing Gaps, Adding Rugs, and Other Cheap DIY Fixes
Small gaps and cracks are often overlooked but can be major sound leaks. Sealing doors with weatherstripping, adding thick rugs or blankets, and using acoustic sealant are simple, cost-effective solutions that significantly improve sound isolation. These fixes work because they prevent sound from escaping through tiny openings, which are often responsible for much of the noise leakage in small spaces.
Sealing the gap around your closet door with weatherstripping creates a more airtight barrier, reducing sound transmission. Adding a thick rug or blanket on the door or walls acts as an absorber, dampening sound energy and reducing reverb and echo. These DIY methods are especially effective when combined with targeted acoustic treatment, because they address the most common escape routes for sound. The tradeoff is that while these fixes don’t turn your closet into a soundproof vault, they can cut noise transmission by at least 50%, making your space much more manageable for both recording and practice. The implication? Small, inexpensive tweaks can yield surprisingly noticeable improvements in sound isolation, especially for those on a budget.
When to Use a Reflection Filter and How It Helps
A reflection filter is a portable barrier placed behind your mic. It’s designed to control sound reflections directly at the source by absorbing or diffusing sound waves before they bounce off surrounding surfaces. In small, reflective spaces like closets, reflection filters are invaluable because they prevent sound bouncing off walls from muddying your recordings. They essentially act as a mini acoustic environment around your microphone, isolating the direct sound and reducing reverberation.
For example, a foam reflection filter around your mic captures the direct vocal sound while blocking unwanted echoes. This results in clearer, more professional recordings without the need for extensive room treatment. Using a reflection filter is especially beneficial when space is limited and you can’t install permanent panels. It allows for immediate improvement in sound quality, making your recordings sound more natural and focused. The tradeoff? While it doesn’t replace full acoustic treatment, it’s a quick, affordable upgrade that directly addresses the most problematic reflections at the source.
When a Closet Isn’t Enough: Upgrading Your Space for Better Sound
If your closet still sounds muddy or boomy after DIY fixes, it’s time to consider structural upgrades. Increasing wall mass by adding additional drywall layers with damping compounds like Green Glue can significantly reduce sound transmission. Sealing gaps thoroughly with weatherstripping and acoustic sealant prevents leaks that undermine your efforts. For serious sound isolation, building a dedicated sound booth or custom enclosure with ducted airflow can isolate noise and low frequencies more effectively than a makeshift closet setup.
Proper ventilation is crucial here because confined, sealed spaces tend to trap heat, which can damage your equipment or reduce performance. Incorporating passive vents, quiet exhaust fans, or ducted airflow systems ensures your rig stays cool while remaining acoustically isolated. The tradeoff? These structural upgrades involve more effort and cost but provide a substantial leap in soundproofing quality, making your space suitable for professional-grade recording or monitoring environments. In essence, when DIY measures no longer suffice, investing in these upgrades can transform your workspace into a true acoustic sanctuary.
Common Mistakes to Avoid When Soundproofing Small Spaces
Many people make the mistake of only treating obvious leaks, like the door gap or a single corner, assuming that’s enough. But sound leaks can occur through tiny cracks, vents, and even through the floor or ceiling if not properly sealed. Overlooking these can significantly undermine your efforts because sound finds the weakest points to escape. Sealing everything—even the smallest gaps—ensures maximum isolation.
Another common mistake is relying solely on foam panels without addressing low-frequency issues. Bass frequencies are notoriously difficult to tame because they tend to build up in small spaces, creating muddiness. Bass traps in corners are essential because they absorb these deep waves before they cause problems. Additionally, mic placement matters—facing your mic into the room rather than away can reduce unwanted reflections and improve clarity. Lastly, neglecting proper ventilation can lead to overheating, which not only risks damaging your gear but can also reduce the effectiveness of your soundproofing efforts due to increased heat buildup. The key is a comprehensive approach that considers all potential leak points and acoustic challenges.
The tradeoff? Overlooking these details can result in a space that sounds better in theory but still leaks noise or produces muddy recordings. Being thorough and methodical in your approach ensures you truly maximize your small space’s potential.
Frequently Asked Questions
How much acoustic treatment do I really need in a small closet?
For most small closet setups, covering about 20–40% of the surfaces with absorption panels at reflection points is enough to significantly improve sound quality. Bass traps in corners help with low-end control, especially if the space sounds muddy or boomy.Can I make a closet good enough for vocals without big construction projects?
Absolutely. Sealing gaps, adding blankets, rugs, and a reflection filter can transform a closet into a decent vocal booth. Upgrading to a portable sound shield and treating key reflection points makes a big difference without breaking the bank.Where should I place acoustic panels in a tiny space?
Focus on the first reflection points — the wall behind your mic and the side walls facing your source. Treating these spots reduces echo and muddiness. Corners with bass traps help tame low frequencies that tend to build up in small rooms.Should I prioritize sealing gaps or adding absorption panels?
Sealing gaps and cracks should come first — it drastically cuts noise leaks. After that, add absorption panels at reflection points to improve sound clarity. Both steps work together for the best results.Is it safe to put a high-power rig in a closet?
Yes, but ventilation is critical. Use passive vents or quiet exhaust fans to keep the space cool. Without proper airflow, heat buildup can throttle your hardware or cause damage over time.Conclusion
Turning a closet into a quiet workstation or vocal booth isn’t magic — it’s about smart placement, sealing gaps, and adding targeted absorption. The ‘rig in the closet’ trick works because it isolates the noise source from your workspace, making noise a non-issue.
Remember, a little effort with the right tweaks can turn a cramped, noisy closet into a clean, controlled environment. Think of your space as a musical instrument — tune it right, and silence becomes your most valuable tool.